Overview
One of the unique feature NetXGATE NG carries which is used to assign a Public IP directly to a server behind a firewall without compromising the security of the network. For example VoIP or call loggers won't work behind Firewall via NAT-ed network this feature is very much useful to configure a public IP with Firewall enabled option to protect the network thus meeting the server requirements as well.
Deployment
Consider a hypothetical example where NetXGATE needs to be deployed in a network which consists of VoIP server placed in the Internet and a router sharing the same IP subnet.
IP schema:
WAN IP – 11.11.11.2 / 29 ( NetXGATE WAN Interface IP)
VoIP server -11.11.11.3 / 29
Gateway - 11.11.11.1/ 29 ( ISP Router IP )
As router and internal servers share the same IP subnet to avoid the above mentioned routing problems, we have deployed NetXGATE between Internal network and Router.
Below given network diagram shows how NetXGATE is deployed in the network.
As per the diagram VoIP Server is having Public IP address and configured in same LAN zone, whereas ISP Router is configured in WAN zone with same subnet IP address.

Configuration
Below steps shall be followed to configure IP Passthrough in NetXGATE Firewall.
Steps to be followed:
1: Login to NetXGATE NG Firewall.
2: Go to Configuration , Under Routing / Load Balance tab you will get IP Passthrough option.
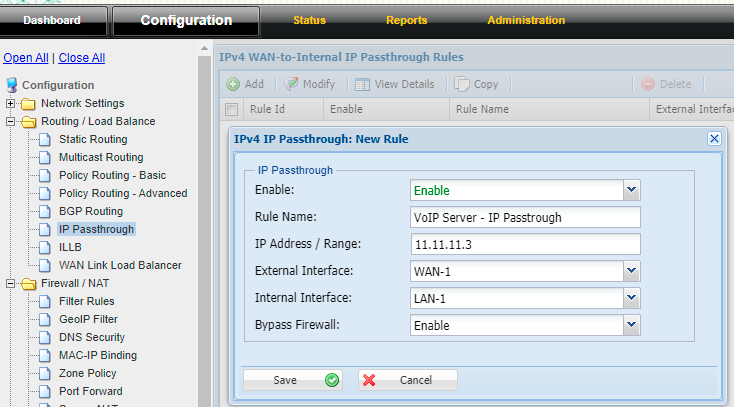
3: Click the + (Add) icon over ‘WAN-to-Internal IP Passthrough rules’ window to add a New Rule.
4: Enable and Under Rule name - Enter a description related to the rule being configured for your reference.
5: Enter the Public IP provided by the ISP under IP Address /Range.
6: Under External Interface , Select the interface you Public IP published. And under Internal Interface select LAN to interface you connect the server.
7: If you need to bypass the firewall for that server > enable the service under Bypass Firewall .
After making the above necessary configuration, Click Save and Restart Service.
Note- In above condition, No “IP alias” ( Under WAN Interface ) should be configured for the Public /WAN Static IP (to be configured) on the Local system.