In computer security, a DMZ Network (sometimes referred to as a “demilitarized zone”) functions as a sub-network containing an organization's exposed, outward-facing services .
The goal of a DMZ is to add an extra layer of security to an organization's local area network.
When implemented properly, a DMZ Network gives organizations extra protection in detecting and mitigating security breaches before they reach the internal network, where valuable assets are stored..
The DMZ Network exists to protect the hosts most vulnerable to attack. These hosts usually involve services that extend to users outside of the local area network, the most common examples being web servers. Because of the increased potential for attack, they are placed into the monitored sub-network to help protect the rest of the network if they become compromised.
In addition to protecting the web server, the DMZ also protects the rest of the network. In this example the DMZ network uses a private subnet and allows access to a web server using different addresses for internal and external users, while preventing access from the web server to the internal network if the web server is compromised.
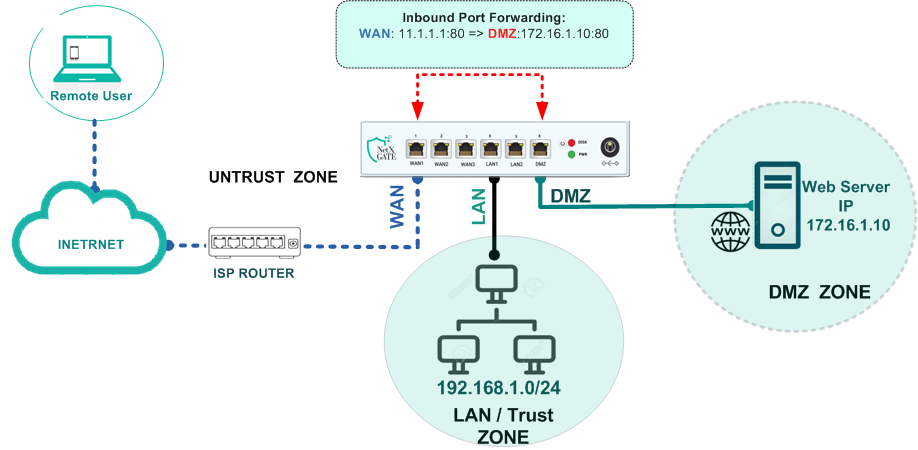
Note-For this configuration to work , the web server must be properly configured with its default route pointing at the NetXGATE's DMZ interface..
Step 1. Configuring the DMZ interface:
1: Login to NetXGATE NG Firewall.
2: Go to Configuration > Network Setting.
Note- This example uses the LAN-3 Port as the DMZ interface.
3: Navigate to LAN3 and Click on it – 'Network Setting' window will Open.
Under LAN Connection Type , Change it to Static (Fixed IP ) , Default Value- Disable.
4: Under Description : Enter a description related to the rule being configured for your reference.
5: In the Static Mode Box , specify the following settings:

9: 5. Click Save and restart Service.
Step 2. Configure the Port Forward access rule:
1: Go to Configuration > Firewall / NAT , Select Port Forward.
2: Click the + (Add) icon over ‘Port Forward Rules ’ window to add a New Port Forward .
3: Under 'Control Box' , Rule Name : Enter a description related to the rule being configured for your reference.
4: Under 'Protocol Box' , Set Action : Forward . And for Protocol : TCP or UDP or TCP/UDP ( Depend On Application . For this exmaple , we using TCP ) and If u need Log enables it.
5: Under 'Incoming Box' , Set Zone : WAN (This will typically be the interface that connects your NetXGATE unit to the Internet /Untrusted Zone ).
6: Set Feild Original Services / Port : 80 ( For this example, the HTTP service uses port 80 ).
7: Under Original Destination : 111.1.1.1 , Mention the WAN IP address ( For this example, the WAN-1 Interface IP is 111.1.1.1 )
For Original Destination or WAN IP Address. You can use:
8: Next , Under 'Forward Address Box' , set Zone : DMZ ( This will typically be the interface that connects your NetXGATE unit to the DMZ Network ).
9: Set Server IP : 172.16.1.10 ( For this example , IP address of the webserver PC under DMZ Zone) .
10: Similarly under Forward Service / Port : Any or 80 . Defualt- Any
The following image shows an example of how to configure the settings:

After making the above necessary configuration, Click Save and Restart Service.