This section describes available options with SSL VPN Server and and its Remote access VPN , using the most common options and a minimal configuration.
This allows your Road warrior | Mobile users to Securly connect to HQ |DC resources as if they were in the Outside office or connect the networks of several geographically distant offices together - all with the added security of encryption protecting your data. NetXGATE Secure SSL VPN supports all commonly used operating system, even Smartphones!
Note : NetXGATE Secure SSL VPN enables administrator to create an Secure SSL-based VPN that supports both Client-to-Site and Site-to-Site ( hub-and-spoke topology ) Tunnel mainly used for Brach | remote office connectivity . Subsequent sections will cover “site-to- site” SSL VPN configuration Guide as well .
1: Login to NetXGATE Firewall, Click on 'Configuration'
2: Click on the 'VPN' , Navigate to 'SSL-VPN Server'
3: Click on '+ Add Server'
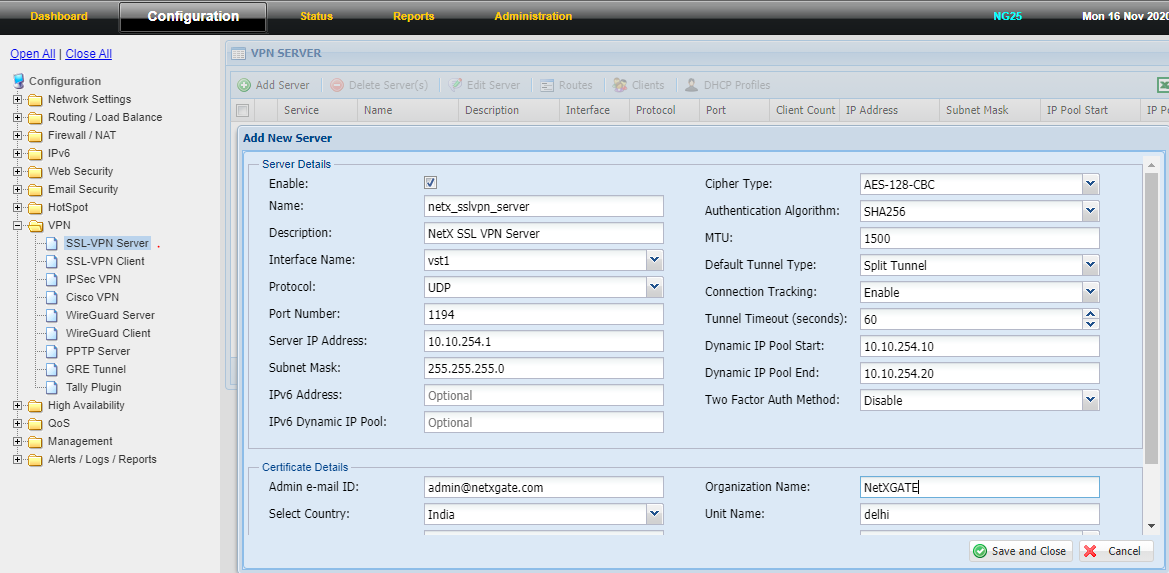
Result : It will open a new page with the name 'Add New Server' .

4: Now under 'Add New Server' , Enter the name of the server under Name Field .
Note: This field can take alphanumeric characters. Special characters such as - and _ are supported. However, the server name must start with an alphabet in the lower case only and can end with an alphabet or a number.
5: Under 'Description' - Enter a description related to the server being configured for your reference. (This field is optional. )
6: Select the 'Interface Name' for e.g.- 'vst1'
7: Select the 'Protocol' where the VPN access via UDP /TCP and provide the 'Port number', Default : UDP/1194.
8: Provide the 'Server IP Address' and 'Subnet mask'.
Note: Server IP Address should be different from local LAN segment. e.g. :10.10.250.1/ 255.255.255.0
9: Select the 'Cipher Type' ,Default: AES-128-CBC
10: Select the 'Authentication algorithm', Default: SHA256
11: Mention the 'MTU' value , Default: 1500
12: Select 'Default Tunnel Type' , Default: Split Tunnel.
13: Select 'Connection Tracking', Default:Enable
14: Select 'Tunnel Time Out' , Default:60.
15: 'Dynamic IP Pool Start' - Specify the start of the dynamic IP address pool
Note: This IP address must be within above mentioned Server subnet mask and can be Start just afetr the Secure VPN Server IP address. . e.g. 10.10.254.2
16: 'Dynamic IP Pool End' - Specify the end of the dynamic IP address pool
Note: This IP address must be within the server subnet mask . Must not be less than the start pool IP. e.g.- 10.10.254.50. As shown in below snap Shot
17: 'Two factors Authentication method' , Default:Disable
Note: It means that two separate identifiers are required for your VPN users to gain access to a particular account. Currently, the SMS based OTP / Mac Binding is the most popular 'second factor'. That we cover in another documents .
Step-2
18: Under certificate details please fill the required fields.
Note:- Enter a valid email id (administrator's email id) and other field that is used in the certificate generation process.
19: Navigate Save > Restart Services.
Step-3
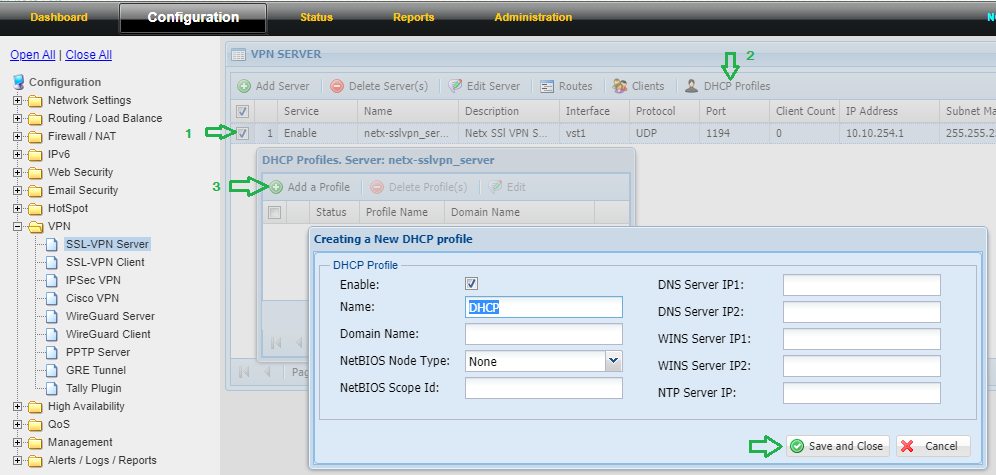
20: Click on the 'VPN', Navigate to 'SSL-VPN Server' . Select the Server and click on 'DHCP Profiles'.
21: Check the 'Enable' button. (This field is enabled by default)
22: In 'Name' field simply mention DHCP Profile Name ( it is Mandatory field ) and Fill the other required field ( if required )
Result :'The new Profile is created Succeffuly' massage will popup once submitted it.
Step-4
23: Click on the 'VPN', Navigate to 'SSL VPN Server' . Select the SSL VPN Server which created above and click on 'Routes'.
24: New window will Open . Click On '+ Add Route' . Under the 'Add New Route' please provide required fields (Network IP and subnet mask, which need to allow to Client)
25: Check-box to enable 'Push this route to the client' . This option is enabled by default.
26: Leave the box Unchecked of 'Add to Server Routing Table' . This option is disabled by default.
27: After making the necessary configuration, Click 'Save and close'.
Result: 'The new server route is created Succefully' massage will popup once submitted it.

Step-5
Configure SSL VPN Client Account :-
28: Navigate to 'SSL-VPN Server' which you created above. Select the server .
Result: It will highlight 'Clients' Option in its menu bar.
29: Click to 'Clients' , it will open a new page with the name 'Client List' [ server name ]
30: Here click to 'Add a Clients', will open a new page with the name 'Creating New Client profile'.
31: Now under Client details - Check-box used to Enable or disable secure VPN client configuration.
32: Under 'Client Name' field to enter the name of the client , This field can take alphanumeric characters.
33: Under 'Client Description' field mention description for that client Or left blank
34: Select 'IP Address Type' , Default value: DHCP.
35: Under 'DHCP profile' Pull down list of DHCP profile. These profiles are created in the DHCP Profile tab.
36: Select 'Tunnel Type', Default value: Server Default.
37: Similarly for 'Push Server routes' and 'Two factors Auth Method' , Default value: Enable and Default respectively
38: Under certificate details please fill the required fields like Client Location and Client email Id .And click 'Save and Close' to save the configuration.
Result : New NetXGATE SSL VPN client Configured.
39: Similarly can be added more client here ( As per requiremet).